


Virtual SmartZone can be installed on both VMWare and Linux KVM virtualization environments. The Linux layer gives the server more performance and here we describe how the command line installation process was performed on one piece of hardware from the start. First make sure that you enable CPU virtualization capability from the hardware BIOS. Other hardware requirements are min 13GB RAM, 2-4CPU, 100GB SSD.
Ruckus recommends CentOS 7 or later for vSZ, in this example I used CentOS 7.8, minimal installation.
If after the installation you happen to be annoyed with US keyboard layout, here's how to enable for example Estonian keyboard:
# yum install kbd
# loadkeys ee (or '#localectl set-keymap ee' for permanent change)
KVM needs to use the bridge interface for network, configure it first. In this example, the ethernet port is named enp0s25 and the bridge port is named br0. First, we copy one content to another and change the necessary parameters in both.
# cp /etc/sysconfig/network-scripts/ifcfg-enp0s25 /etc/sysconfig/network-scripts/ifcfg-br0
# vi /etc/sysconfig/network-scripts/ifcfg-br0TYPE="Bridge"
DEVICE=br0
PROXY_METHOD=none
BROWSER_ONLY=no
BOOTPROTO=static
IPADDR=172.28.0.206
NETMASK=255.255.255.0
GATEWAY=172.28.1.254
DNS1=172.28.1.254
DEFROUTE=yes
IPV4_FAILURE_FATAL=no
NAME=br0
UUID=bebd6aa4-6b60-4027-8b4d-daf1ee1086de
ONBOOT=yes
ETHTOOL_OPTS="autoneg on"
DHCP=no
# vi /etc/sysconfig/network-scripts/ifcfg-enp0s25
Only one change needed:
BRIDGE=br0
DHCP or static ip configuration is according to your needs.
Now the restart for network is in order to apply the changes:
# systemctl restart NetworkManager

checking:
# brctl show
# ip address  (or for example # ip address show br0 )
Next you have to install the virtualization software (several packets needed):
# yum -y install bridge-utils libvirt qemu-img qemu-kvm virt-install
Start and enable libvirtd:
# systemctl start libvirtd
# systemctl enable libvirtd
Now we need to download the vSZ image, here is an example of scp in the opposite direction, ie from a Windows to Linux:
# scp "Downloads\vscg-5.2.0.0.699.qcow2 " root@172.28.0.206:/var/lib/libvirt/images/
You are ready to set up the first virtual server!
# virt-install --virt-type=kvm --name vSZ --import --ram 13631488 --vcpus=4 --os-variant=generic --network=bridge=br0,model=virtio --disk path=/var/lib/libvirt/images/vscg-5.2.0.0.699.qcow2,size=100,bus=virtio,format=qcow2
Check if your virtual server is visible after install:
# virsh list
and start it:
# virsh start vSZ
Now you need to get into the new server's console:
# virsh console vSZ
This provides a virtual console window that can be exited by pressing CTRL + Shift and] if necessary.
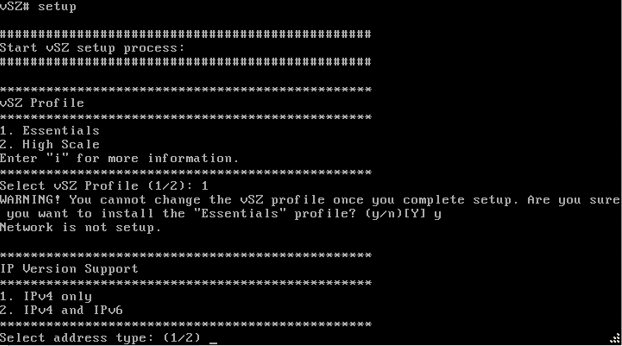
Next you need to log in to vSZ (admin / admin) and start the setup:
# setup
The following setup dialogue has some questions and options to configure, first Essential / High-Scale and then the network parameters:
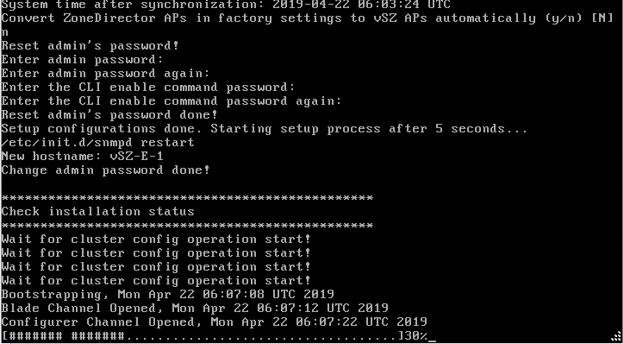
Answer the remaining questions as well, then the server will do some installation:
If an error occurs at this stage due to for example insufficient memory allocation (minimum requirement 13GB) then in KVM it may not be understood that the process has stopped - the screen still shows:
Domain installation still in progress. Waiting for installation to complete.
In this case you should manually shutdown the virtual server:
# virsh shutdown vSZ
For troubleshooting see the install log:
# less /root/.cache/virt-manager/virt-install.log
If you need to delete the virtual server:
# virsh undefine vSZ
Useful to start the server automatically after restart:
# virsh autostart vSZ
Ruckus also teaches how to make a new virtual server under KVM via a graphical menu, starting on page 253:
The GUI is viewed by vnc, the vnc connection number must be obtained in advance:
# virsh vncdisplay vSZ
The guide also shows that you need to install a few more packages first:
# yum -y install qemu-kvm qemu-img virt-manager virt-viewer virt-install libvirt libvirt-phthon libvirt-client
Finally, once the command line setup has done its job, further configuration can be done through the web interface Setup Wizard: http://xxx.xxx.xxx.xxx:8443
The installation guide pdf file shows more detailed pictures of Setup Wizard beginning page 219.